Tuesday, February 2, 2010

Easy-Peasy Personalized Pillowcases Tutorial

I made these for my kids for Christmas and they loved them! These would also make cute personalized birthday presents. They are so simple and fun to make, you might get addicted like I have!

You should already have most of the stuff. Here's what you will need for one standard size pillowcase:
1/4 yard white fabric- I prefer 65 poly/35 cotton blend. It's really cheap and holds up well.
up to 1 and 1/4 yard patterned fabric- So far I have chosen licensed prints for my kids, but anything will do. Read my note* before buying your fabric.
small piece of freezer paper- you can buy a roll at Wal-mart in the foil and baggie section.fabric paint- I like Tulip brand. It goes on nice and thick and I rarely need more than one coat.
X-acto knife
piece of leftover cardboard
paintbrush
cutting mat and rotary cutter
sewing machine
thread
iron/ironing board
your computer and printer

*A note about buying fabric
One thing to note is that you want the pattern on the fabric to appear horizontal after the pillowcase is sewn. The last thing you want is your Care Bears looking sideways. How much fabric you will need will depend on how the pattern comes off the bolt. For example, if the pattern comes this way, you will need 1 and 1/4 of a yard.You will need 3/4 of a yard if the fabric comes off the bolt like this...
The reason for this is that we are going to cut one large piece that will be folded at the top. Once folded, we will have the horizontal patterned piece of the pillowcase. We want it to look like this:
NOT THIS:
So keep that in mind while buying and cutting your fabric. If the fabric you have chosen can face either way or doesn't have a distinct horizontal pattern to it, you can just buy 3/4 of a yard.

That's it! Let's start. Set up your ironing board and plug in your iron. We will be using a 1/4 inch seam allowance for the whole project.

Cut a 26.5 x 38.5 piece from your patterned fabric. Set that aside.
Cut an 8.5 x 38.5 piece from your white fabric.

Fold the white piece in half longways and press; then fold it in half the other way and press. Now you know where the center is.

Get on your computer and find a cute font to print out your kid's name with. If you don't have any fonts you like on your computer, go to Kevin and Amanda's free fonts site and you're sure to find something cute. Open up a word document and enlarge your name so that it's no taller than 4 inches. That includes tall letters like lower-case d, h and l. Go to format in the menu bar and then choose character and chose the outline feature. That way when you print out the name, you won't use up your whole ink cartridge; it will just print a nice outline for you. Like so:
Trace the name onto a piece of freezer paper with the shiny side down. Using your X-acto knife and cutting mat, cut out the letters on the paper. Try not to make any extra slices because the fabric paint will end up seeping out of the stencil. Don't forget to keep any inside pieces like the loops in the letters e, p and d. You will need them! For really great and thorough instructions for freezer paper stenciling, check out Dana's tutorial at Made.
Center the stencil onto one side of the white fabric and then iron it on. Note: If you want the name to appear on a certain side of the finished pillowcase (right or left) you will need to put the small fold up and the long fold at the bottom of the name. For example, for the name to be on the left side of the pillowcase, you will place the name here:
The fold of the fabric should always be underneath the name. There will be no seam allowance on the fold, so you can place your name as close to the fold as you like. I like to keep in about 1/4 of an inch or more from the fold. If you want it centered from top to bottom, just remember that there will be 1/4-inch seam allowance on the top.

Place the cardboard under the fabric so that paint won't seep onto the rest of the fabric. Paint on a nice layer of fabric paint and let it dry for 3-4 hours. If you think it needs another layer of paint, go ahead and do that and let it dry again.

When the paint is dry, peel off the freezer paper. Doesn't it look pretty? Cover it with scrap fabric and press for a few minutes. Make sure to fold the white fabric lengthwise again if you unfolded it during the painting process. Now put the white and patterned pieces together (the matching 38.5 length sides), right sides together, (raw side of the white) and pin well. The name will be hidden as you sew. Sew the 38.5 inch length (remember all seam allowances will be 1/4 inch). Zig zag over the seam allowance. Now iron that seam up towards the colored fabric.
We're going to topstitch on the colored fabric just above the seam line, a little less than 1/4 inch so as to catch seam allowance underneath that we just ironed up. Not perfect, but it's okay!
Almost done! Can you believe how easy these are? Now fold the pillowcase in half, right sides together, pin it well and sew it closed. I start sewing where the white fabric is to keep it even. Zig zag your seam allowance. Inside it out and press. And you're done!

Wednesday, August 12, 2009

Diaper Cake Tutorial

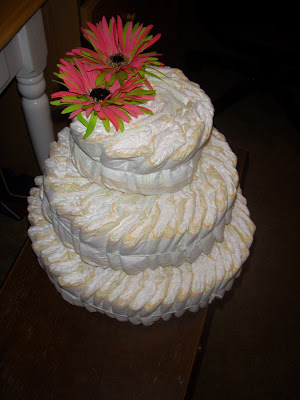
Hey there! This is my tutorial for making a diaper cake. If you have never seen one, you might think that it's a weird idea (my husband does). But these make such cute centerpieces for any baby shower! It's a great alternative to giving someone a boring box of diapers. Why not dress it up a little?

There are a few ways to make diaper cakes. A lot of people like to throw tons of baby items onto the cake (binkies, burp cloths, onesies) which is fine, but I like to keep mine more simple and classy-looking with flowers and maybe one stuffed animal or a pair of baby shoes on top. You can make them two or three-tiered, but I always go with three. Whatever you decide to do is fine and will be cute!

To make a three-tiered diaper cake, you will need:

Around 80 diapers in size 1 (I get size 1 because babies grow out of newborn diapers quickly, plus the mom won't have to take the cake apart right away. I usually ask the mother-to-be what brand of diapers she prefers- my kids had picky bottoms- but if there isn't a preference, buy whatever brand doesn't have lots of pictures all over the diapers. Plain white looks better. Pampers Swaddlers are a good choice, but can be pricey.)
1 tall baby bottle, any brand
string or yarn
ribbon, 1.5 inches wide or bigger (You can use more than one color.)
fake flowers
a little stuffed animal, baby booties, or some other small item to put on top of the cake

florist pins (optional)
either a plastic platter or a platter from your cupboard to transport the cake

So here's what you do:

1. Take about half of the diapers and place them around the bottle like the picture below. (The recipient of this diaper cake preferred Huggies diapers, which had colors all over them, but what can you do?☺)2. Cut a piece of yarn and cinch it around the diapers. Pull tightly and tie in a knot. Don't worry if the diapers are unevenly placed; you will be able to adjust them after you tie the knot. Pull or push the diapers whichever way you need so that it looks pretty uniform throughout.

3. To make the middle layer, take about 2/3 of the remaining diapers and make another circle of diapers in the same fashion, around the bottle on top of the first layer. Adjust your diapers as needed.

4. Make the top layer by taking a single diaper and rolling it up. Grab a second diaper and roll that around the first one. Keep repeating this until you create the same layered look as the other two layers. If you don't use all of the diapers up in the final layer, you can always stuff a few diapers into the other layers. You don't want your top layer to be too big.To attach the top layer to the bottom two, I use the stems from the flowers, which also double as decorations for the cake. Place your top tier on top of the cake, and stick the flowers in between the diapers to secure it to the bottom two layers. I usually use quite a bit of flowers. The more you use, the more secure it will be. You can do this after you add the ribbon if you want.5. Decorate your cake. I usually start with the ribbon. Measure and cut your ribbon to fit around each layer of the cake. You can either tie it in a bow or pin it securely with florist pins (used for corsages). Both of these looks are shown below. (Click on the pictures.)

Once your ribbon is secured around the layers, take some scissors and snip the yarn tied around each layer and remove it. Place your decorations on top of the cake and stick the flowers into the diapers to hold everything on. Make a cute little tag, and you're done!

Monday, May 4, 2009

Easiest Quilt Ever! The Rag Quilt Tutorial

Make a cute baby quilt, a TV throw, or a warm camping blanket! These blankets are so easy to make and customize to your needs. The nice thing about these quilts is that unlike "real" quilts, they don't have to be perfect! Now that's my kind of quilt! :)

The quilt shown in this tutorial is a finished size of about 38 x 50 inches, using 8-inch cut squares. The pattern uses 48 finished squares, 6 squares x 8 squares. You can make the squares bigger or smaller, and add squares if you want the blanket to be bigger. This size is good for a baby, toddler, or small child.

For my quilts I use three coordinating flannels. I have heard that denim works too. You can use as many (or as little) different patterns of fabric as you want, but you will have to make sure that you have enough of each fabric for the number of squares used in your quilt (both sides).

Here's what you will need for a baby/toddler quilt:

2 and 2/3 yards of patterned flannel


1 and 1/3 yard of a coordinating solid flannel

1 and 1/3 yard of another coordinating flannel (try to find a stripe, plaid, or dot)

48 x 36 inch piece of Warm and Natural batting (or enough to make 48 6-inch squares)

thread (two or three colors)
scissors
rotary cutter

cutting mat
ruler
sewing machine

walking foot for your sewing machine (optional, but highly
recommended)

Instructions:

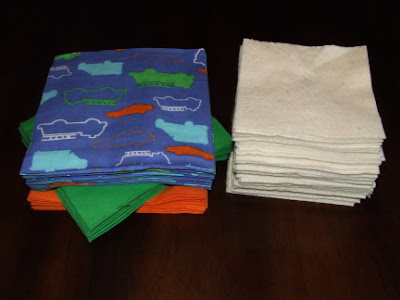
1. Cut your fabric using a mat, ruler and rotary cutter. Cut the fabric into 8-inch strips, then cut each strip into 8-inch squares. I make 8-inch squares because it maximizes my fabric; I don't have big chunks left over after cutting each square.

*You should probably end up with a little bit of leftover fabric, including four 8-inch squares. I have made matching pillow covers with this leftover fabric in the past. I will post a tutorial for these pillow covers later on!

Note: Remember, if you have enough fabric, you can always cut your squares bigger. Just make sure that your squares are all the same size. You will also need more batting. No matter the size, you will lose 2-inches per square for seam allowance. So we are cutting 8-inch squares, but the finished product will have 6-inch squares and the excess will make up the fray in between the squares. That might be something to keep in mind. If you want your quilt to end up with 8-inch squares for instance, you will need to cut 10-inch squares.

2. Cut the Warm and Natural into squares that are 2 inches smaller than your flannel squares. In this case, cut 6-inch squares.
I find it is easier and faster to cut the Warm and Natural with scissors than with a rotary cutter. I double up the batting, draw a line using a ruler, and cut it with my scissors. Then I cut individual squares using my rotary cutter. You could also double the strips up and draw lines and cut with scissors as well.

Here is what you should have after cutting:
3. Arrange your squares in sandwiches: flannel on top and bottom (right sides out) with a square of batting centered in the middle.
If you have three fabrics, you should have double the amount of squares in one of the fabrics as the other two. That is because the patterned fabrics will be sandwiched together and the other two will be back and front to each other. So for this quilt, I will end up with all blue sandwiches, and sandwiches that are green on one side and orange on the other.
Remember if you are using stripes or plaid to arrange the pattern going the same way on all of the sandwiches. Decide if you want the stripes to be vertical or horizontal, and place them all that same way when forming sandwiches. For example, in this quilt, my truck fabric is placed horizontally.

4. Attach your walking foot to your machine. The walking foot keeps the fabric from bunching and puckering by helping it feed through the machine better. If you don't have one, sew slowly and you may need to help the fabric through by gently pulling on the back of the fabric as you sew. Walking feet can be purchased at sewing supply stores for around $20.

Thread your machine using contrasting thread. For example, I used orange to stitch onto the blue fabric, blue thread for the green fabric, and green thread for the orange fabric. Confused yet?

Thread your bobbin accordingly. For this square I am sewing, there is blue thread in the bobbin and green thread on top.
5. "Quilt" the squares together by sewing a line diagonally down each of your squares. Don't stop and cut the thread after each square; instead do a chain stitch by placing the corner of the next square and continuing to sew.
You will end up with a big long chain of squares. Cut the thread in between each square and do the same thing again, sewing a diagonal line in the opposite direction, making an X in each square.
You will now have 48 squares quilted together.
6. Arrange a row of 6 squares into a pattern making sure your horizontals and verticals are going the right way (back side too). I flip the orange/green squares every other time.
Then continue with the second row. See the pattern forming?
You might want to do this on the floor. You should end up with 8 rows.
Then you can bunch them together in order like this while you sew one row at a time. This is what I do, but whatever works for you is fine. Just make sure that they are in the right order.
7. Here's where it gets tricky. You are going to sew one row together at a time (six squares). Sew on a 1-inch seam allowance, with the seam allowance SHOWING. If it helps, you can lay your row out and pinch the fabric up where the seams would be to remember where to sew.

Here are the squares for my first row, with the first two squares sewn together. Notice the seam allowance is showing on the front side of the blanket.
Continue all the way down the row until it is finished. Make sure you sew the row so that all of the seam allowances are showing. Then finish all of the other rows one at a time.
Here is a picture of all of the rows sewn. The rows are not yet sewn together; I should have spaced them out so you could see that.
8. Now sew your rows together, still keeping the seam allowances showing on the same side. (One side of the quilt has the extra fabric for fraying and one side is flat.)
Make sure that you keep the pattern going the right way. One trick I use is to start with the bottom two rows and pinch where the seam allowance will be on top of the quilt. Then I go and sew those rows together. When I am done, I unfold it and place it back down where it goes. Then I pinch it together with the next row and so on.

One thing to keep in mind when you are sewing the rows together is to try and get the squares' seams to match up. It won't matter on the frayed side of the quilt, but you will see it on the back flat side. So if you care that they are perfect (or at least close) make sure they are matching up as you sew over them. You may need to pull the fabric one way or the other.

This is how I do it. I tuck the seam allowance on the bottom side up and let the seam allowance on the top go down. They kind of fit like a puzzle that way. I am no quilter; I don't know the correct way to do patchwork if there is one, but this seems to work for me. It won't matter which way your fabric goes, because those seam allowances are going to get cut up and frayed anyway.
The last sewing step is to sew around the entire quilt, again using a 1-inch seam allowance. You can sew completely from side to side, or start one inch inside and pivot your quilt with your needle inserted one inch from the end of that side so that it's one continuous line. You should end up with a quilt that looks something like this on the front:
...and this on the back:
9. You are almost done! Now grab a good pair of scissors and plop down in front of the TV. You are going to snip those seam allowances about every 1/4 inch. It won't matter if they are perfect. The intersections of the squares can be tricky, but it won't matter which way you cut them. I just cut along the rows, but whatever you do will be fine. Make sure you cut around the perimeter of the blanket as well.
10. And now for the easiest step of all! Wash the blanket in the washing machine. That's how you get this cute frayed up look. Make sure you clean out your lint filter before you dry it- you will have a lot of fuzz from this quilt.
And you're done! Here are some others I have made. Pillow cover tutorial to come!
More questions? Check out my Rag Quilt FAQ post here!