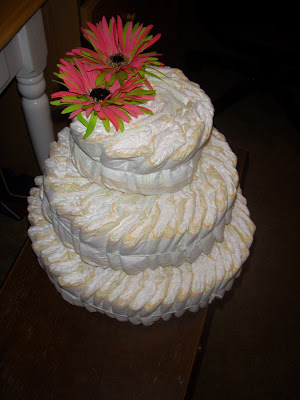
There are a few ways to make diaper cakes. A lot of people like to throw tons of baby items onto the cake (binkies, burp cloths, onesies) which is fine, but I like to keep mine more simple and classy-looking with flowers and maybe one stuffed animal or a pair of baby shoes on top. You can make them two or three-tiered, but I always go with three. Whatever you decide to do is fine and will be cute!
To make a three-tiered diaper cake, you will need:
Around 80 diapers in size 1 (I get size 1 because babies grow out of newborn diapers quickly, plus the mom won't have to take the cake apart right away. I usually ask the mother-to-be what brand of diapers she prefers- my kids had picky bottoms- but if there isn't a preference, buy whatever brand doesn't have lots of pictures all over the diapers. Plain white looks better. Pampers Swaddlers are a good choice, but can be pricey.)
1 tall baby bottle, any brand
string or yarn
ribbon, 1.5 inches wide or bigger (You can use more than one color.)
fake flowers
a little stuffed animal, baby booties, or some other small item to put on top of the cake
florist pins (optional)
either a plastic platter or a platter from your cupboard to transport the cake
So here's what you do:
1. Take about half of the diapers and place them around the bottle like the picture below. (The recipient of this diaper cake preferred Huggies diapers, which had colors all over them, but what can you do?☺)

3. To make the middle layer, take about 2/3 of the remaining diapers and make another circle of diapers in the same fashion, around the bottle on top of the first layer. Adjust your diapers as needed.
4. Make the top layer by taking a single diaper and rolling it up. Grab a second diaper and roll that around the first one. Keep repeating this until you create the same layered look as the other two layers. If you don't use all of the diapers up in the final layer, you can always stuff a few diapers into the other layers. You don't want your top layer to be too big.

Once your ribbon is secured around the layers, take some scissors and snip the yarn tied around each layer and remove it. Place your decorations on top of the cake and stick the flowers into the diapers to hold everything on. Make a cute little tag, and you're done!


No comments:
Post a Comment